 Live Canva Design Training!
 It doesn’t matter if you have been blogging for a month or three years, if you want to take your blog to another level and start growing your email list, you need an opt-in freebie to make that happen.
But you have no design skills, you don’t think you’re creative enough and, um…. where do you even begin?!
[disclosure]
If you don’t have an idea for your opt-in freebie yet, spend some time figuring out exactly what your audience needs. It has to be something valuable enough they will be willing to hand over their email for.
This might be a no-brainer for you, or it could be a challenge if you don’t know exactly what your audience needs.
A successful opt-in freebie will provide your viewers with a quick fix or a solution to a problem they are having.
Once you have the content ready, it’s time for the fun part! I’m going to share with you a step-by-step process for creating an opt-in freebie that you can add to your website and start building your email list.
Step One: Create a Plan
The first thing you need to do before getting started on ANY design project is to create a plan of action. I can not stress how important this is; it will give you a good handle on the flow of your message. Assess what you have to work with and determine the following:
The format of your opt-in freebie. Is it a checklist, a worksheet, a cheat sheet or a workbook?
The name of your opt-in freebie. Brainstorm a few ideas then ask your audience what resonates more with them. You want the name of your opt-in freebie to be memorable and catchy.
One to two sentences describing what your opt-in freebie is. This “tagline” usually describes what your viewer will get out of your freebie. What problem will it solve? What will the viewer accomplish with it? Having a tagline can help especially is the name of your opt-in doesn’t describe much.
What information will be included? The most important thing to do before you start creating anything is to figure our exactly what you want to be included in your opt-in freebie and organize the content in a way that visually makes sense for your viewer.
What is the overall look and feel you want to portray? If you have branding in place, by all means, stick with it for your opt-in freebie. Don’t go picking random colors and fonts. If you don’t have any branding in place, keep it simple. Stick with no more than 2-3 fonts and choose images that support the overall vibe you want your viewers to feel.
 Step Two: Get Inspired!
Whenever you start a new project, one of the first things you should do is gather some inspiration. I’ve been designign for over 15 years and even my designer brain is not always full to the brim of layout ideas and creative butterflies.
Even the best designers seek inspiration, so it’s nothing to be ashamed of. Many people diy-ing their own visual content think they are not creative enough to design something that looks good. But with a little inspiration and guidance, you can absolutely do it!
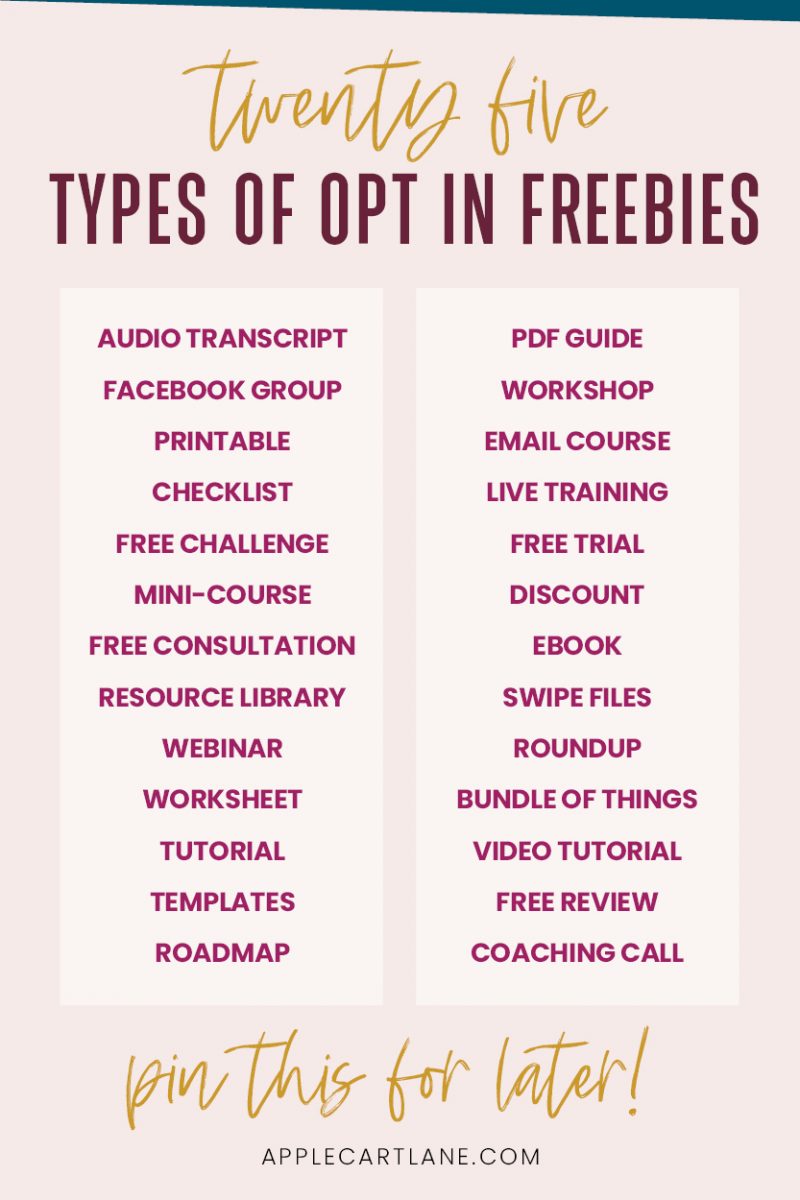
If you need some inspiration, I’ve rounded up some great opt-in freebie ideas.
Step Three: Learn Some Basic Design Skills
Once you have a plan of action for your opt-in freebie and some design inspiration, it’s time for the fun part: designing your freebie!
in this tutorial, I am going to assume that you want to offer a pdf worksheet, checklist, guide, etc. for your freebie. Don’t worry if you’re creating something like an email course, or free webinar. A lot of these instructions will still apply to you since you will eventually need to generate support documents and promotional graphics.
Make sure your opt-in looks professional.
Enroll in my Free 30-Minute Graphic Design Traning to learn some great design tips for creating your opt-in freebie. YES, it’s only 30 minutes (cause I know you’re busy!) but you are going to learn SO much! You’ll also get a very brief introduction to six super important graphic design principles that will improve your graphics when you use them.
Now that you’ve got some design tips under your belt, it’s time to create your opt-in freebie so you can share it with the world!
Step Four: Design Your Opt-In Freebie
If it’s one thing that all successful opt-in freebies have in common, it’s that they are all visually appealing. Even though we are taught not to judge a book by its cover at a young age, we do it anyways! Your opt-in freebie should look valuable. If it looks unprofessional, you get lower sign-ups and conversion rates.
Head on over to your design program of choice. I am a total InDesign nerd, but you don’t need a professional design program to pull of your first opt-in freebie. You can use Canva, which is a free design software.
Open a new document. The most common size for an opt-in freebie is a standard 8.5″ x 11″ since this is the perfect size for printed pages, but you really can create it any size if you don’t intend your viewer to print it. Maybe you want a square booklet, or a more horizontal layout might work better for your content.
Cover Page
Your cover page should include the name of your opt-in, which should be the largest font used on your opt-in freebie. You want the title of this thing to stand out, right?
Add the tagline or subhead that you decided on in step one. Put the tagline near the header. Add an image to the background and make sure it is not too bust. Make sure your image gives off the general vibe of your brand. Add your logo somewhere on the cover. Finally, add your blog URL or logo, and a copyright. (You don’t want someone stealing your hard work.)

You can use your cover page to promote your opt-in freebie on social media and Pinterest. I like to add a drop shadow, and fan out the pages a little bit to make to look “real”.
Incorporate your Branding
Just like I said to make sure your imagery is on-brand, you’ll also want to incorporate your brand fonts and colors into your opt-in freebie. This will create repetition and brand recognition when your opt-in is on its own.
Follow the K.I.S.S rule!
K.I.S.S Is an acronym for keep it simple, stupid. Basically, that means that most of the time, less is more. Don’t go overboard with designing your opt-in freebie.
The Content!
After your cover page is designed, you can move onto developing the meat and potatoes of your opt-in. I can’t tell you exactly how to design this part, because all opt-ins are incredibly different. There is also not really a correct way to design, just principles and rules to follow. I’ll share a few to get you started:
- Make sure your text is readable and don’t use too many fonts. (Stick to 2-3 max.)
- Don’t go crazy with color or design effects.
- Make sure everything is aligned properly and don’t forget to give your document some space around the edges.
- Use headings to break up your information.
- Use visual hierarchy (make some things larger than others so there is an order to your design)
- Create a template so your page numbers, headings, etc. are in the same exact place on every page.
For tons more graphic design tips, don’t forget to enroll in my Free 30 Minute Graphic Design Training.
Add a Call to Action
The last thing you might want to add is a page at the end of your document that prompts your viewer to take another step. This could be joining your Facebook group, purchasing a product or signing up for a consultation. This is not mandatory, but it is a chance to ask your viewer to do something! People don’t do what they aren’t asked to. You can also take this as an opportunity to thank them for downloading.
Step Five: Saving Your File for Delivery
File types can be confusing, but the best file type to save your opt-in freebie as is a simple .pdf. They are recognized by almost all computers and are a versatile file that views good both on a computer monitor or printed. If you ever think someone will print your freebie, you’ll want to save it at the highest resolution possible, usually 300 dpi. Upload your file to the media library in WordPress and connect it to your email service provider.
Congratulations! You now have a completed opt-in freebie that’s ready to be integrated into your website.
For a conversion-focused approach to collecting those precious leads, I use and recommend Thrive Leads. It offers the most robust platform I have ever seen for collecting leads in a variety of ways. Thrive Leads integrates seamlessly with ConvertKit and just about every other email service provider in just a few clicks.
I hope this post was helpful and don’t forget to pin it for later!
I can’t wait to see what you create!


The checklist idea is really smart Kristin, really smart. No confusion, just clarity. Goads us to think in an orderly, calm, confident fashion.
Thanks for sharing 🙂
Ryan
Happy to help, Ryan!
Hi Kristin,
This is very helpful information. I will definitely be using some of your tips for my current freebie.
My goal lately has been to try to have an opt in for EACH blog post that I do. But while I think it WOULD be an easy thing to do, I also think that I am freaking myself out by overthinking it. Like you said, it can be as easy as a checklist… I am going to try to remember this going forward, since one of my goals is to build my email this coming year. Thanks for sharing this valuable advice. 😀
Thank you for commenting! Good luck with your email list, opt-ins truly do help!
This is super helpful information! I didn’t think about the “next step phase” though. Thanks for a great blog post!