Live Canva Design Training!
Are you ready to create some amazing Pinterest Pins in Canva to market your incredible content? If so, you’re going to want to stick with me. Because in this article, I’m going to break it all down step-by-step.
Here’s What You’re Going to Learn:
- The secret recipe to creating eye-catching Pinterest Pins in Canva
- Tips for creating catching headlines
- Super sneaky stock photo secrets
- Graphic design rules and principles for creating Pinterest pins
- A simple technique that can increase your clickthrough rates by up to 80%!
By the end of this article, I know that you are going to be so inspired to jump into Canva and start creating your next or first set of Pinterest Pins!
Not a Designer? No Problem!
When you’re not a trained graphic designer, the thought of designing Pinterest Pins that actually look good can be pretty overwhelming! Oftentimes, you’re stuck in Canva, moving things around, trying to get your images to look just right, which can be incredibly time-consuming! You and I both know that you have zero time to waste, so let’s figure out a way to streamline the process!
Three Things You Need Before You Begin
Content
The first thing that you are going to need is content. Every pin image that you create needs to have a URL that you are sending your traffic to. I would assume if you’re reading this article, you already have some amazing content that you are ready to get eyes on.
Headlines
I recommend having three to five different headline options that you are ready to add to your pin images. It’s best to come up with these beforehand so you know what you’re working with. This will also help when it comes to finding images to use on your pins.
Design software
I love, use, and 100% recommend Canva! The free version is going to be just fine, especially if you’re just getting started. But eventually, I can almost guarantee that you’re going to be ready to up-level to the pro version of Canva and unlock all of their fancy design tools.
Try Canva Pro FREE for 30 days!
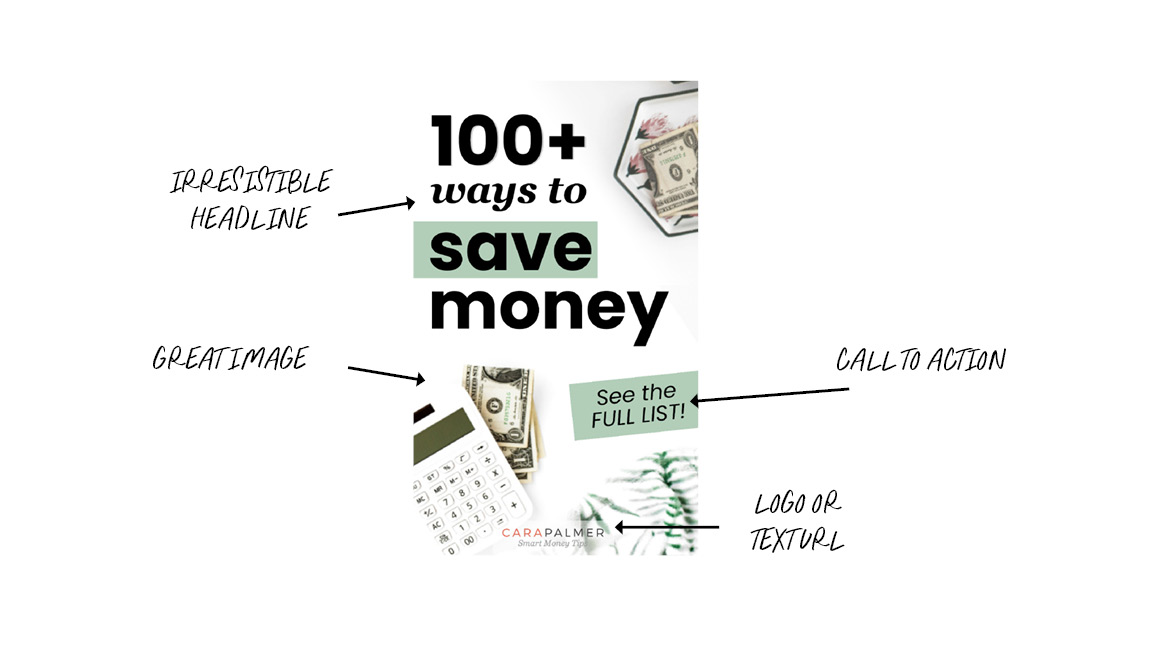
Anatomy of a Pinterest Pin
Designing graphcis doesn’t have to be complicated, so I’m to simplify the whole entire pin design process for you. Most Pinterest Pins are made up of four design elements. pretty simple, right? Each one of these elements has its own set of rules to follow and things that you’re going to want to implement design and marketing-wise to ensure that your pins are optimized and designed to convert:
- Stock Photo or Image
- Text headline
- Call to Action
- Logo or Text URL
Let’s Start Designing!
Once you have your content ready to go, a handful of juicy headlines, and your Canva account, it’s time to start designing! Open up Canva. To create a document, click the purple create a design button in the upper right corner.
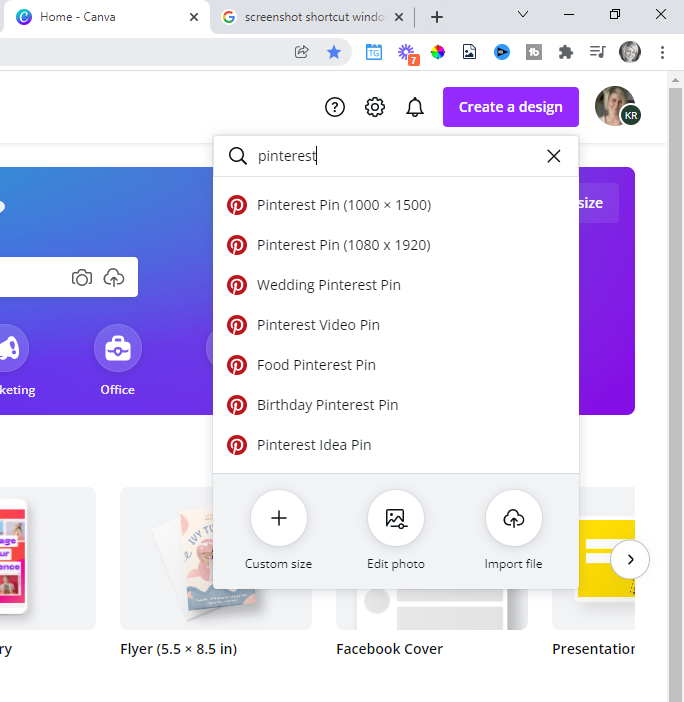
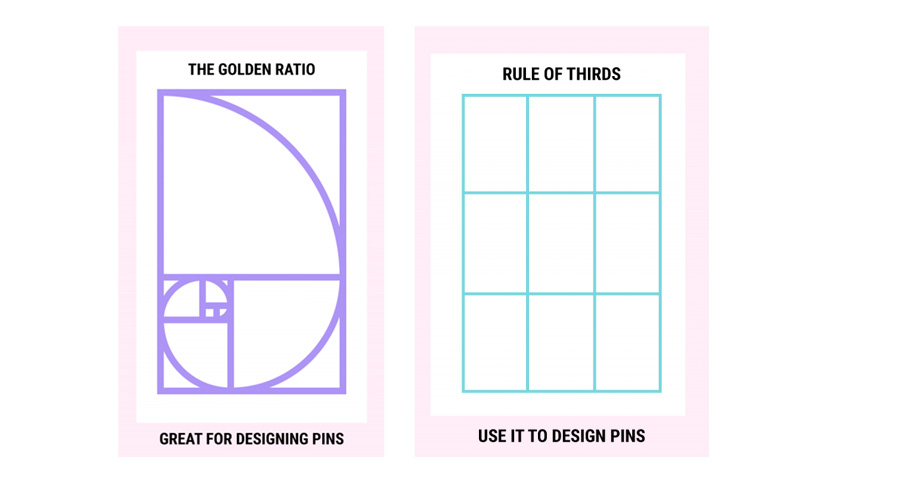
Type in “Pinterest” and you’ll see some options to choose from. You’ll choose the first option, which is 1,000 pixels wide by 1,500 pixels tall. This isn’t just a random size! The 2:3 ratio is very close to the golden ratio, which has been known for being the most beautiful and aesthetically pleasing shape for centuries. #mindblown!
Considering Pinterest is a visual platform, this is no surprise!
Start with a Template
Once your canvas is open, you’ll see a bunch of pre-designed templates in the left panel.
I highly recommend using templates when you’re getting started. It’s going to save you tons and tons of time. Most of these templates are free to use for all Canva users, so keep in mind that they’re often pretty generic and can get overused. There’s also not a ton of consistency in these templates. All of the design styles are different. If you decide to use any of the templates, look for ones that are similar in style so your pins have some consistency.
Templates Outside of Canva
If you want to ensure that your pins look unique enough to stand out in the Pinterest feed, there are tons of templates you can find outside of Canva! This is a great investment for your business because you can reuse them over and over and over. When you purchase Canva templates outside of the program, you’re given a link that will automatically upload them straight into your own Canva account. It’s super simple.
Here are a few templates from my go-to bundle of Pinterest templates:
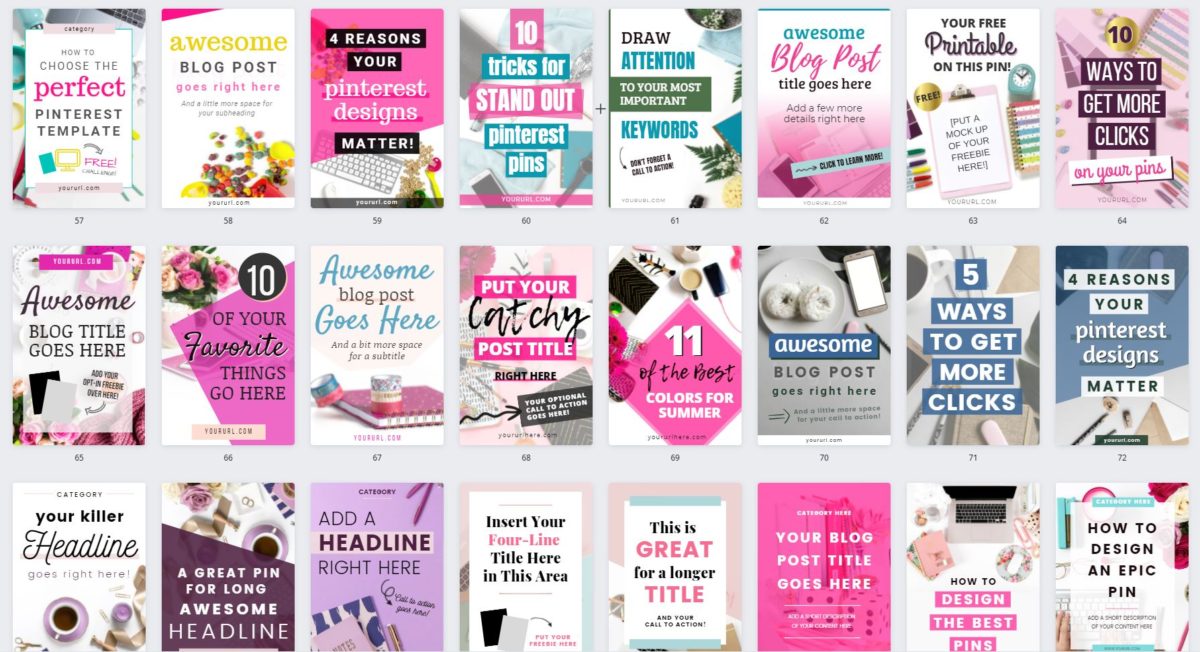
As you can see, they all look unique but still have a similar style to them. There are stock photos already in place, so I can get a good idea of what types of images might work well for any given template. There are a ton of different layout options to choose from! These types of template bundles can make creating pins super simple while ensuring you look professional on Pinterest.
Once you have some templates that you feel are going to work well with your specific content and the headlines that you came up with, it’s time to go on a stock photo hunt.
Find some Stock Photos
Your stock photos have a lot to do with the end result of your pin image, so it’s important that you choose them wisely. Canva has an extensive stock photo library, but keep in mind that all of the Canva users have access to the same library. Oftentimes, some of these images are a bit overused. (Just like their templates!) If you want to create unique pin images that fit your own brand, I highly recommend that you pop off of Canva and explore some stock photo websites. There are plenty of free and paid options to choose from.
Some of my favorites are:
Pixabay (free)
Unsplash (free)
Depositphotos (keep your eye out for their AppSumo deal!)
IvoryMix (Grab 550+ free styled stock photos here!)
PixiStock
Styled Stock House
Investing in a set of stock photos that fit your overall vibe and tone is going to be incredibly valuable and 100% worth it. And, they’re going to make your pins look crazy professional. When you’re looking for images, It’s really important to consider how you’re going to integrate text into them. Look for images that have a natural white space, which is a perfect canvas for adding text, and think about the different design techniques that you can apply to the stock photo to ensure that your text is readable on the pin.
A few things to avoid:
- Stock photos that have a lot going on or are super busy. This is going to detract from any text that you put on the pin image.
- Stock photos that are overused or look too generic. To ensure your pins images look unique and different than what’s already been done, do a deeper search or try out some not-so-obvious search terms.
Keep your stock photos organized!
One big part of designing efficiently is keeping all of your assets and elements organized. I recommend that you create a folder inside of Canva where you can keep all of your stock photo options handy. This way, when it comes to integrating them into your layout, you have them all in one place, and you can see exactly what you have to work with.
Once you’re happy with your stock photo options, you can start testing them out to see how they work in each layout.
Add your Text Headline
The next step is to add your text headline to your pin images.

There are a few things that you need to keep in mind as you work with text:
You want to use your own brand fonts if you’ve got them. This is going to help create that visual consistency and help your viewers recognize and start remembering your Pinterest content. Combine two fonts to create a more interesting look, and don’t use more than three fonts on your pin image.
You want to make sure that you include keywords into your headlines and that your keywords stand out from the other text on your pin. This is a way to get into your viewers’ heads. Think about what kind of search terms they might be typing into that search bar and use those exact keywords or phrases in your pin headline text. You can to draw attention to these words by making the text larger. Maybe you use a different font or put a block of color behind the word. Whatever you do, you want to make sure that these words are literally jumping off of your pin.
Make sure that your headline is readable. Many pinners are using Pinterest from their smartphone, (like me when I’m hiding in the closet from my kids. Ha, ha!) so you want to make sure that your text is not too small. Avoid highly decorative fonts and make sure that any elements on your pin can be seen even at this small size.
Add some Buzzwords and/or Flavor Text
You can add even more pizazz to your headlines by adding in a buzzword or some flavor text!
Buzzwords are going to be different depending on what niche you’re in, but they are catchy little words or phrases that help evoke some feelings and emotions in your viewers. These will vary depending on what niche or market you are in. Think about your audience’s pain points and what makes them tick.
Here are a few examples:
- Super simple
- Stress-free
- Low budget
- Keto-friendly
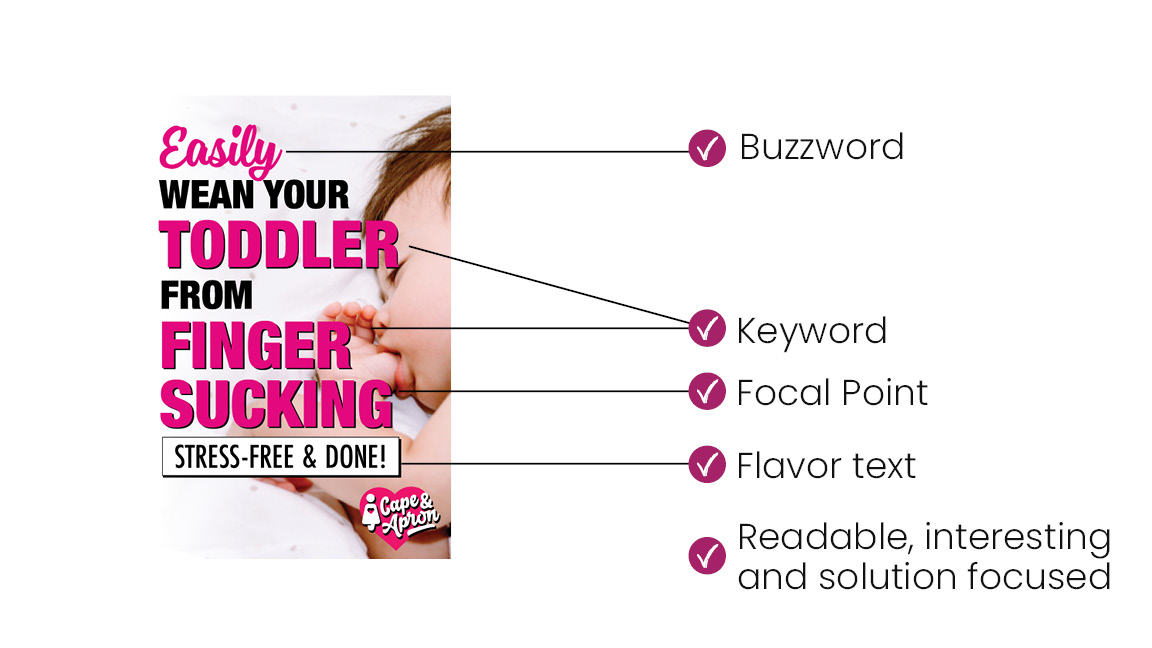
Flavor text is additional text that can be added to your pin to support the headline. Your audience wants to know what is in it for them when they’re looking for a solution to their problem. The more information that you can provide on your pin image without overwhelming them, the better.
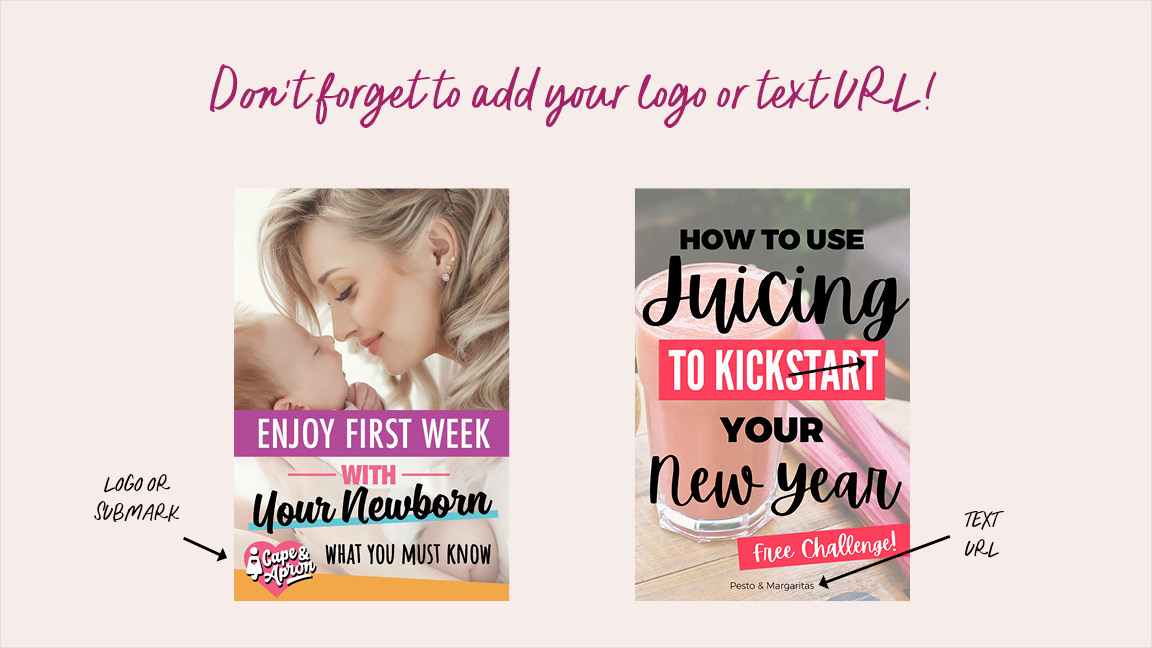
Add your Logo or text URL
If your logo works with your pin image, you can use it, but oftentimes, logos can be hard to see at this small size. Adding a simple text-based URL is another option. This is not intended to be part of the design, but more of a branding element that is going to help your viewers start to recognize you and your amazing content on Pinterest.
Add a Call To Action to Increase Click-throughs
If you are super serious about increasing your website traffic, growing your email list, or selling more digital products or courses, (which I bet you are!) then you’re not going to want to miss this important element!
Here’s the thing – your audience doesn’t know exactly what you want them to do when they interact with your content. You actually have to tell them what you want them to do! This can be done by incorporating a call to action on your pin images.
A call to action is a short phrase that gets your viewers to engage with your content and take action. This is where the real traffic comes from because they are so powerful when it comes to click-through rates.

Depending on your business goals, your call to action may be a variety of phrases:
- Read the full blog post
- Download the free guide
- See the full list
- Get started
- Register today
- Take the challenge
- Join the Facebook group
- Watch the free video training
- Listen to the podcast
These short phrases can really encourage your viewers to click into your content. You can keep it simple and add a text-based call to action to your Pinterest Pins, but my favorite way to encourage clicks is to include some type of digital mock-up. (Tablet, computer screen, .pdf, etc.)
Even if you don’t have any digital products or haven’t started your email list yet, you don’t want to skip this step! At a minimum, you can encourage them to learn more or read the full article. Simple phrases like “You won’t believe #7!” can also encourage clicks.
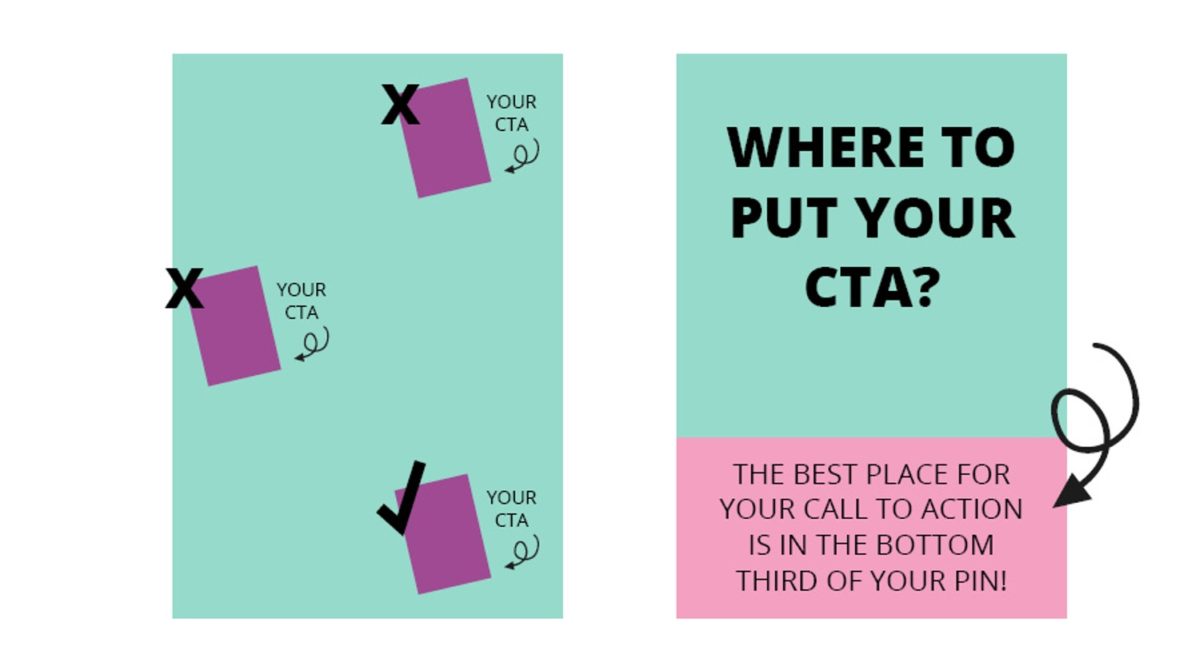
Where to put your Call to Action?
Since your call to action is usually one of the last things that your viewers see, it’s a good idea to include it in the lower third of your pin image.
Graphic Design Rules to Follow when Designing Pinterest Pins
Now that we’ve covered all of the essential elements that go into creating the perfect Pinterest Pin, let’s touch on a few graphic design housekeeping rules. There are many graphic design rules and principles to follow, here are three that I believe are going to make the most impact on your pin images:
Alignment of text and elements
I see this mistake all the time! When you are creating Pinterest Pins in Canva, or any graphic for that matter, you want to make sure that all of your text is properly aligned. When you’re just getting started, using center alignment is going to be the easiest and it’s probably going to result in better are looking Pinterest Pins. But, you can also align text to the left or to the right if you’re feeling confident, or find an image where it’s necessary.
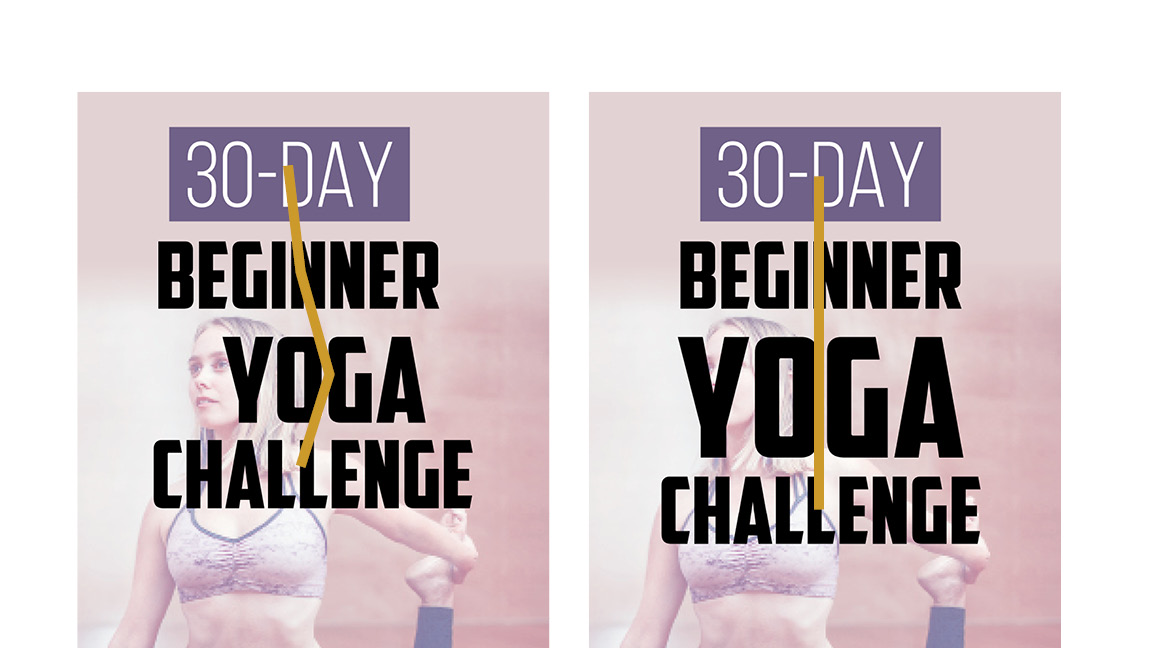
Canva makes this super easy to do! Simply hold down the shift key and select all textboxes or elements you want to align. Click the position tool, then click center, right, or left. This is a really simple way to tidy up your pin images before you export them.
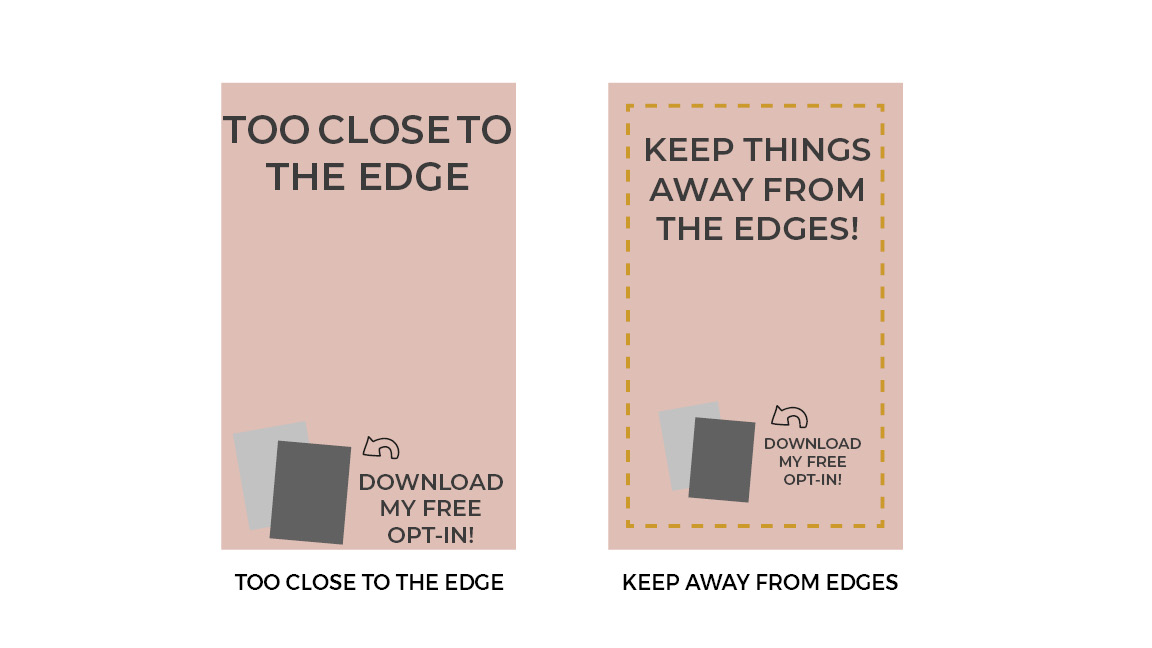
Spacing of elements on your pin
Pay attention to the spacing of your elements. You don’t want things to be too close to the edge, or too close to each other in a way that causes your viewer to be a little bit agitated or confused about your message. If elements are related to each other, keep them close in proximity. If elements are not related, make sure there’s enough space between them that your viewer understands your message.
Images that are used as a background can span off the edges of your pin without issue.
Use contrast to make your pins readable!
You want to make sure that the text on your pin and the information that you are including is very, very readable. If you are using a dark background, make that you use a lighter text. If you’re using a light background, go for darker text. You can even use contrast to help those keywords pop off of your headline.
You may need to use a color overlay or drop the transparency of a background image to make sure that there’s enough contrast from your text and the background that your viewer is going to be able to read your headline.
If your viewer can’t read your pin or your layout is confusing, they’re just going to keep on scrolling.
Export your Pinterest Pin Images
Once you’re happy with how your pin images look, click the Download button in the upper right corner, then select either JPEG or PNG. Upload those pin images directly to your Pinterest account or embed them onto any webpage or blog article on your website.
Designing Pinterest Pins in Canva Doesn’t Have to Be Time Consuming or Overwhelming!
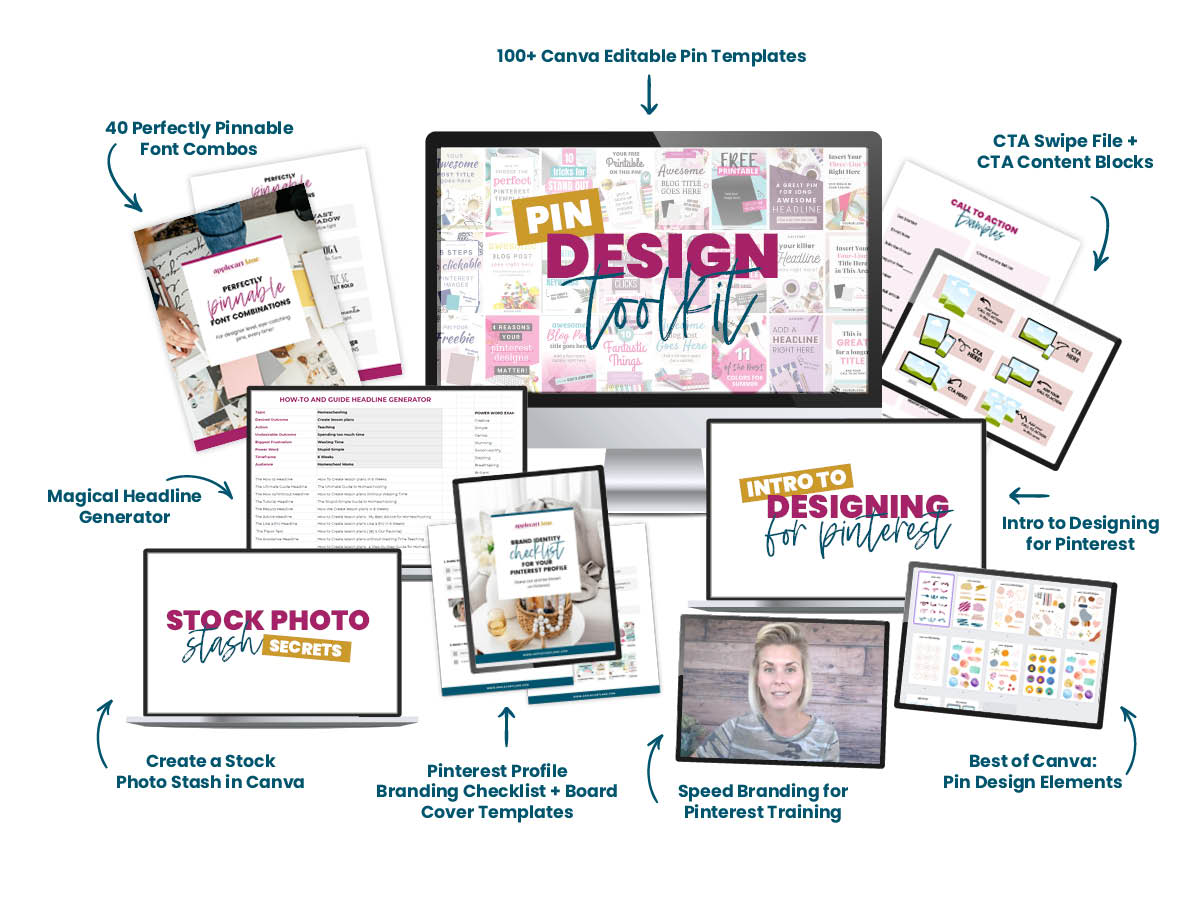
If you really want to take a shortcut and start creating amazing Pinterest Pins, then the Pin Design Toolkit has your name written all over it!
The toolkit includes over 100 designer level pin templates, a catchy headline generator, so you’re not going to be stuck creating headlines, a copy and paste call to action content blocks, and tons of other video training and design resources that are going to help you create some amazing pins without wasting hours in Canva!
If you like this article and you want more branding and design tips, there are a few ways we can connect!
👉Grab one of my awesome freebies
👉 Subscribe to my YouTube channel
👉Follow me on Instagram
I can’t wait to see what you create!
XO Kristin
Liked this post? Share the love and pin your favorite image for later!